There are a lot of different ways to add or install Google Tag Manager code to a client’s website. Please carefully consider which option is best for your client. Please use the following information as a guideline to determine the best action to take. When in doubt, use the plugin method. We used to recommend people to create a child theme and put the code on the site but we have found that this is too technical and we have broken too many sites in the process. We do not want to be breaking sites especially while we are trying to win over a potential client. This is why we have simplified the process by just installing the plugin when the ideal setup isn’t in place.
Last Updated on November 27, 2019
Future Video Going Over Scenarios will go here
Which Scenario Applies?
Depending on what theme the site is using will determine how you should install GTM but remember, when in doubt, just use the plugin option
- The7 Theme – Use Sebo’s addendum plugin
- Check Theme Options for GTM code placement
- Manually add GTM code to the site
- Use the Google Tag Manager Plugin
- Install GTM to Unbounce Pages
When The7 is the Active Theme
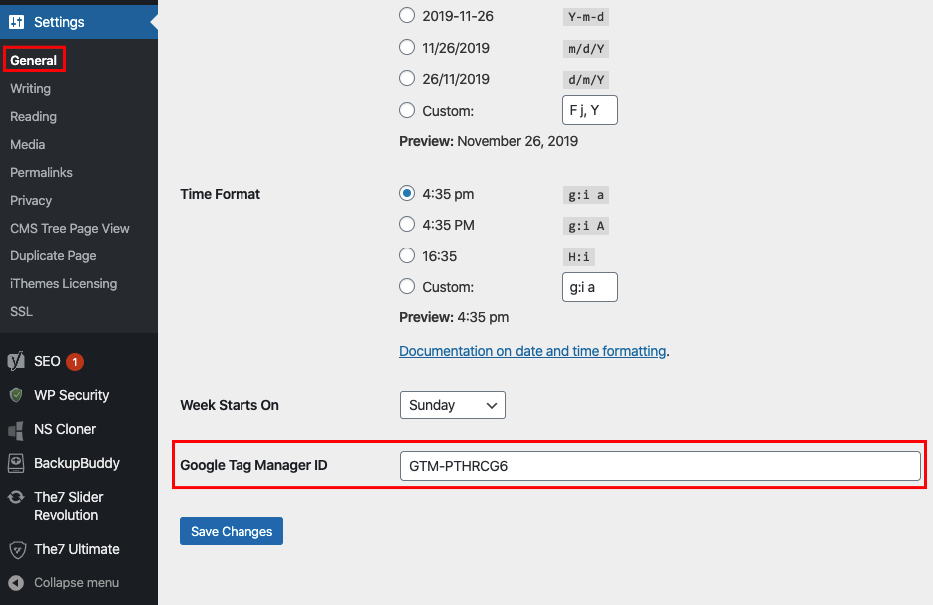
If The7 is the active theme of the site you are wanting to install Google Tag Manager on then you are in luck. Sebo has developed a very simple plugin that creates a field on the General Settings page (Settings -> General) that allows you to add the GTM-ID. Once you add the code to this field the Google Tag Manger code will be installed on the site. This Sebo created plugin is called “the7 Sebo Addendum” and can be found on the Egnyte Drive at the following path: Shared/Website Build Resources/ Plugins and Themes/dt-the7-sebo-addendum.zip.
This plugin not only adds the GTM field, it also creates a shortcode [code]2026[/code] that will output the current year as well as enable the Gravity Form option to hide field labels when you are inserting the label as a placeholder.

Future Video Goes Here
Check Theme Options
Some themes integrate GTM right into their theme. Before you try and manually add the GTM code or install a plugin you should look through the theme options to see if they already have a field or place in the settings where you can either enter the GTM ID or the 2 snippets of code.
Manually Add GTM Code to the Site
This is where you especially need to be careful. If you make a mistake when editing the theme’s core files you could potentially break the website. To determine if you can or should install GTM manually, please go through the following items:
1. The theme is either custom or a premium theme with an active child theme
You shouldn’t install the code to a theme that could be updated because once the theme is updated your code is erased. So you should only manually add GTM code to custom themes that don’t receive updates or to child themes. If a premium theme is installed with no child theme then you could create a child theme (which is more technical) or you could simply use the plugin method.
2. You have access to the theme files (preferably through FTP)
Now you want to make sure you have access to the theme files. The best and most secure way would be through FTP or through cPanel because if you make a mistake you can easily undo. You could also edit through Appearance -> Editor. This method is strongly discouraged because if you make a mistake in the code you could potentially break the site including the WordPress Admin and then you will have to get FTP access to fix the site.
3. The active theme has a standard header.php file
Once you have adequate access to the theme files you should open the header.php file. In this file you should see an opening <head> tag and and opening <body> tag. This is where you will put the GTM code. If the child theme doesn’t have a header.php file then you can copy the parent’s header.php file and create one for the child. Never make customizations to the parent theme.
Future Video Goes Here
Future Video About Google Tag Manager Plugin
Using the Google Tag Manager Plugin
First, you will need to install the plugin from the WordPress repository. The plugin is called “Google Tag Manager for WordPress” by the author “Thomas Geiger”. Once you install and activate the plugin, there will be a new setting option under Settings for this plugin. Insert the GTM ID in the appropriate field and choose the “codeless injection” option. Once you choose this option and save, you will want to check a few pages on the site to make sure they are working properly. If you see any issues with the website then the codeless injection must not be compatible with the site and you will need to go back and switch to the default option. Otherwise you should be good to go.
Install GTM to Unbounce Pages
If you are using Unbounce you will want to make sure you install Google Tag Manager or Google Analytics to the landing pages so you can track the data. This step is often forgotten so please make an effort to not forget to do it.
