Last Updated on November 21, 2019
[qode_advanced_tabs][qode_advanced_tab tab_title=”Linkable VC Section/Row/Column”]
How to make a Row / Column or Element linkable
If you are ever in need of having an entire column or row or element of some sort linkable rather than just the content within the box then the following tricks will allow you to do just that.
Take the following jQuery code and put it in the custom scripts section of the website or if you are only wanting the effect on one page then add a raw js widget below where you need this to happen. You will need to add a custom class to the section you want to be linkable and then replace “.cards” with whatever class you use in the js code below.
[js]
<script type=”text/javascript”>
jQuery(function($){
$(“.cards”).click(function() {
window.location = $(this).find(“a”).attr(“href”);
return false;
});
});
</script>
[/js]
What this code does is it looks for the class (.cards) and then it looks for an a tag within the class and copies the href and applies it to the (.cards) class. Because the (.cards) class still isn’t an “<a>” tag it won’t look like a link when you hover over it but if it works, when you click on the element it should still link regardless. Once you confirm it works then I would recommend adding the following CSS to make the hover action look like a link:
[css]
.cards:hover {
cursor: pointer;
}
[/css]
[/qode_advanced_tab][qode_advanced_tab tab_title=”Advanced Visual Composer Tips”]
[/qode_advanced_tab][qode_advanced_tab tab_title=”Slanted Rows”]
[/qode_advanced_tab][qode_advanced_tab tab_title=”Template Library”]
[/qode_advanced_tab][/qode_advanced_tabs]
WooCommerce does a really good job at documenting their plugin. Rather than recreating the wheel, the following will help point you in the direction of some of the WooCommerce trainings to start with. If you want to start at the root of the trainings, please go to docs.woocommerce.com
- If you are starting from the beginning with no WooCommerce experience and the site currently doesn’t have WooCommerce installed then you will want to start with:
- Most generally when you get your first hands on experience with WooCommerce you will be working on a website that is already setup. You will want to check out the following sections:
- 3. Set Up Products
- 5. Shipping
- The easiest shipping options to setup are “Free” and “Flat Rate”. Other methods are available such as USPS, FedEx, and UPS calculated shipping but they require a lot of configurations such as entering product dimensions and weight as well as define package sizes.
- Core Payment Options
- PayPal, Stripe, and Authorize.net are most common.
- PayPal doesn’t require an SSL certificate since the transaction takes place off of the website but in 2018 all websites should be protected with HTTPS anyways
- Stripe puts the processing on the website so it requires HTTPS and is very simple for clients to create an account and get approved and setup. It can even accept Apple Pay as a form of payment. This is a great option for clients who don’t have super high volume in sales
- Authorize.net is very popular but only really seems to make sense for clients who process enough transactions in a month. So they typically have lower per transaction rates than Stripe and PayPal but they charge monthly and daily batch fees which Stripe doesn’t so I always recommend the client price out what they would pay in fees for the different providers and find out which option is cheapest for them.
- Settings & Options
- Setting up Taxes in WooCommerce
- Now if you use the “WooCommerce Services” plugin and sign in to JetPack you can enable “Automated Tax Calculation”
- https://docs.woocommerce.com/document/woocommerce-services/
- Adding Products/Product Categories to main menu
- For some reason WordPress likes to make things tricky for users on the Menu’s page inside of WordPress. If you want to add a Product Category to a menu in WordPress you have to click on “Screen Options” in the very top right corner of the menu page which will show you a list of various post types and taxonomies. Just check on the ones you want to have visible. There are also other options you may want enabled in here as well…
Here is something that I often send to clients as we begin building them an ecommerce website:
- Products
- Names, descriptions, variations (sizes, colors, etc), images, pricing
- Shipping – how much will we charge? Flat rate is easiest to setup. We can also do more complex shipping options but they take more time to setup and may require additional premium plugins
- Taxes – Are we charging sales tax? If so, what regions and at what rate(s)
- Checkout – Who are we using for payment processing? Who you end up choosing is up to you. We aren’t payment processing experts. Here are a few options but there are others as well. You just want to make sure that the one you go with will work with WooCommerce. What ever you end up choosing, you will need to setup the account and then provide me certain information depending on which processor.
- PayPal
- No monthly fees. Pricing is 30cents + 2.85% per transaction.
- Transaction takes place on PayPal’s website not on the website.
- Downside is because the transaction happens offsite sometimes Google Analytics doesn’t track the conversion properly
- An SSL certificate isn’t required
- Stripe (stripe.com)
- No monthly fees. Pricing is 30cents + 2.85% per transaction.
- Transaction takes place on the website. Customers can also have their payment method saved if the website is expected to have a lot of repeat customers.
- An SSL Certificate will be required (As low as $9.00/year)
- Apple Pay support
- Square (squareup.com)
- Authorize.net
- Other payment processors (from your bank or elsewhere)
More tips on backup buddy including how to setup schedules and limit backups as well as a caution to always run a fresh backup prior to making updates to the website (primarily plugin/wordpress updates).
SVG Support
You can simply install a plugin called “SVG Support” and configure the options to your needs or if you want to reduce the amount of plugins on the site you can add some code to the theme’s (child theme if it is a market place theme) function.php file to enable SVG support
[code]function add_file_types_to_uploads($file_types){
$new_filetypes = array();
$new_filetypes[‘svg’] = ‘image/svg+xml’;
$file_types = array_merge($file_types, $new_filetypes ); return
$file_types;
}
add_action(‘upload_mimes’, ‘add_file_types_to_uploads’);[/code]
Here is an article that does a great job explaining it. https://themeisle.com/blog/add-svg-to-wordpress/
[qode_advanced_tabs][qode_advanced_tab tab_title=”Overview”]
How to create a page where you can promote your client’s customers to leave positive reviews/feedback
[/qode_advanced_tab][qode_advanced_tab tab_title=”Popup”]
Review Experience Popup
- Install and activate the “popup-builder-platinum.zip” plugin which is found on Egnyte under Website Build Resources -> Plugins and Themes
- Create a “HTML” popup with the plugin. Set the title to “Review Experience Popup” or whatever you want it to say
- Paste the code below in the “Text” view in the general section.
- Replace yourplaceidgoeshere with the business PlaceID within the code.
- By default, we will be sending poor experience to “/satisfaction-survey/” URL which you will create later. If you want it to go to a different URL then set the URL to be what you want it to go to.
- Press the “Save Changes Button”
- Go to “All Popups” and take note of the shortcode for the popup you just created. As long as it is your first one and you didn’t press the “Preview” button when building it it should be sg_popup id=1
[code]
How was your experience?
[/code]
[/qode_advanced_tab][qode_advanced_tab tab_title=”Survey Page”]
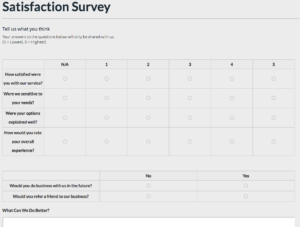
Satisfaction Survey Page
- Create a new page and name it “Satisfaction Survey” and make sure the permalink is “/satisfaction-survey/”. If you want the page to have a different URL then be sure to update the URL in the Review Popup as well.
- Put whatever information you want on this page. If you want it to look like the following survey you will need to use Gravity Forms with the “Survey Add-On”.
Gravity Forms with Survey Add-on
- Install Gravity Forms and add in the license key if the site doesn’t already have it
- Install the Survey Add-on by going to Forms -> Add-Ons and find the add-on and install it
- You can now either build out your own survey form or if you want a starting point you can download the example form and import it into your WordPress site
- To import the sample, go to Forms -> Import/Export and choose “Import Forms” and upload the file and press the import button.
- You can now go to “Forms” and make any other changes you like to the form such as add/remove fields or setup a confirmation page and notifications.
- Add the survey form to the Satisfaction Survey Page
[/qode_advanced_tab][qode_advanced_tab tab_title=”Reviews Page”]
Google Reviews Plugin
- Install the “google-reviews-business.zip” plugin which is found on Egnyte under Website Build Resources -> Plugins and Themes
- To activate the plugin you will need to provide a license key. From within the same folder on the Egnyte drive there is a txt file called “Google Review Plugin Licenses.txt”. Open it up and you will see a list of license keys. Take the next available one and enter the name of the website before the license key and save the file. Now copy that license key and within WordPress go to Settings -> Google Reviews Business -> Settings and enter in the license key
- You will then need to enter in an API key. To do this you will need to:
- Follow the directions in the plugin to do this. Do not add sites to our billing profile
- Once the plugin is installed and active with a valid license go to Plugins and update it to the latest version.
- You can now configure the plugin by going to Settings -> Google Reviews Business -> Shortcode Builder and fill out the prompts
- Enter the name of the place (and address if it doesn’t pull up)
- Select the Place
- Under Review Options be sure to check the first two options “Try to get more than 5 Google reviews” and “Enable Google Rich Snippets”
- Under Display Options choose a photo for the icon. The icon is in the shape of a circle so using a square image is best
- Enable/Disable the other settings as you see fit and grab the shortcode
- Alternatively, you can use the following pre-built shortcode and just replace the following:
- place_name – nameoftheplace
- place_id – placeidgoeshere
- place_photo – http://theurloftheimagegoeshere.png
[code][google-reviews-pro place_name=’nameoftheplace’ place_id=placeidgoeshere auto_load=true rating_snippet=true pagination=10 sort=1 min_filter=4 place_photo=http://theurloftheimagegoeshere.png disable_user_link=true view_mode=list open_link=true lazy_load_img=true reviews_lang=en]
[/code]
Leave us a Review Button
Simply add the following html where you would like the button to go. Inside of the a tag you will notice that there are 2 classes. “button” and “sq-confirm-popup-1”. The first class should make the link look like a button depending on the theme styles. If not, add in the necessary classes to your theme that will make it look like a button. The second class is what causes the popup to happen. Make sure this class matches the shortcode of the review popup.
[code]
[/code]
Look at the page and make adjustments as necessary
If the popup works but you don’t see the smiley and frowny face then the site might not be using Font Awesome. Add the following script to the top of the popup html and it should fix them
[html]<link rel=”stylesheet” href=”https://use.fontawesome.com/releases/v5.0.8/css/all.css” integrity=”sha384-3AB7yXWz4OeoZcPbieVW64vVXEwADiYyAEhwilzWsLw+9FgqpyjjStpPnpBO8o8S” crossorigin=”anonymous”>[/html]
If this doesn’t work, you may need to add the style sheet to the header, or you may need to download the font awesome 4 and add it directly to your site and link to that style sheet instead.
If the faces are working but the words are next to the faces, add <br> in front of both Good and Poor inside the Popup text.
If the words are now under the faces, but when hovering the space next to the faces is underlined, add the following code before </style>.
[html]a.review-popup-a { text-decoration: none;}[/html]
If the line is now gone, but the face color doesn’t change on hover, add the following code before the previous code (make sure to change the color to something that will fit the site – use the dropper tool in the upper right hand corner of the browser to easily copy a color).
[html]a.review-popup-a:hover {
color: [insert color];
}[/html]
[/qode_advanced_tab][qode_advanced_tab tab_title=”Review Badge”]
If you add a badge to the footer of the website it will have the reviews show up on all of the pages of the website which will in turn allow Google to be able to show star ratings on any/all pages in their search results. We obviously aren’t in control which pages Google will add these ratings to but at least the markups are there for Google to be able to grab them if they choose to.
Using the plugin you will want to generate a shortcode that will give the right type of badge you want. Here is the shortcode for the badge we are using on SeboMarketing.com You will obviously have to modify the shortcode to match your client’s needs.
[google-reviews-pro place_name=’Sebo Marketing’ place_id=ChIJse7hmjKFTYcRP5gXax4CCdY auto_load=true rating_snippet=true place_photo=https://www.sebomarketing.com/wp-content/uploads/2017/10/square-icon-sebo.png view_mode=badge_inner lazy_load_img=true]
[/qode_advanced_tab][/qode_advanced_tabs]