Last Updated on January 28, 2025
Welcome to the Landing Page Beginner exam!
This training and exam covers the very basics of landing page building. This includes: what makes a good landing page, Unbounce, and landing page duplication.
You will take an exam with one of the Fulfillment Trainers. Throughout the training, if you have any questions, feel free to email one of the trainers (their email addresses are found on the fulfillment team page), talk to them in person, or reach out over Google Chat. When you’ve finished the training, go over the exam and then schedule a time on Google Calendar to take the exam with a trainer.
What Makes a Good Landing Page
The purpose of a landing page is to get a user to convert. We facilitate conversions by giving essential information in a manner that is easy to digest. The page should be appealing and invoke a sense of urgency for the user to act. The page should include a Call to Action that very clearly directs the user on what to do next. Overall, we want to convince the user to submit their information (for lead generation websites) or purchase a product/service (for ecommerce sites).
When making a landing page, we really like this resource from Unbounce: Landing Page Elements & Landing Page Best Practices
Please read through the articles – we often reference this several times during the landing page building process. There are great visual aids as well that make for a fantastic template.
Be prepared to explain the following and their significance in relation to landing pages:
- Unique Value Proposition
- Hero Shot
- Benefits
- Proof
- Call to Action
This isn’t directly stated in the above article, but you should note that the most important information should be higher up on the landing page. When creating landing pages, we often refer to having content “above the fold.” This refers to anything you can see on the page without having to scroll. It is essential that the most important and compelling information is above the fold, including the Call to Action.
Duplicating a Page in WordPress
This section will cover how to copy an already existing landing page in WordPress and make edits to it to target a different keyword. You should already know how to edit the text and images on a page; if not, refer back to the basic WordPress training.
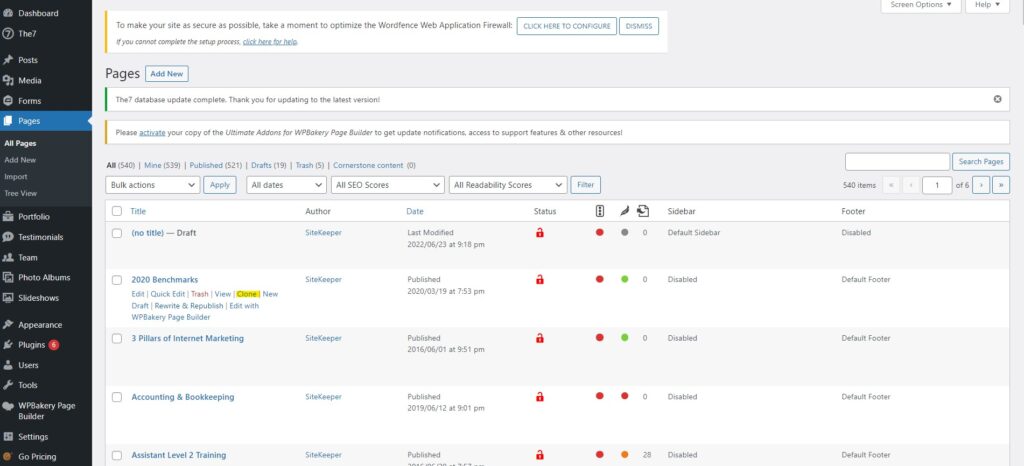
Some websites have a clone or duplicate plugin.
- Go to All Pages
- Find the page you are wanting to copy
- Hover over it and look for the word Duplicate or Clone – sometimes it will create the copy and you have to then go find the copy in the list of pages, or sometimes it will take you straight to the editor for the new page.
- Be sure to rename the page and give it an appropriate URL
- Edit any text or images as needed
- Publish the page
If the website uses WPBakery, one way to make a copy of the page is to create and save a template of the current page, then apply that template to a new page.
- Navigate to the page editor of the page you are wanting to copy
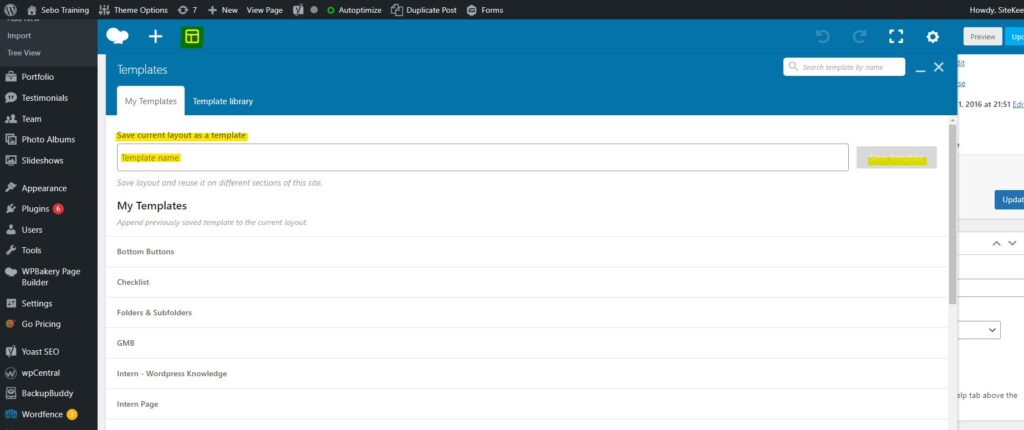
- Click the template icon:

- Name the template in the text bar
- Save the current layout as a template by clicking the Save Template button
- Create a new page
- Select the template icon again
- Find the template you just created – it is in the list under My Templates. Hover over the template you want and click the + button
- Edit the text and images as needed.
- Be sure to give the new page a Title & URL that fit the keyword
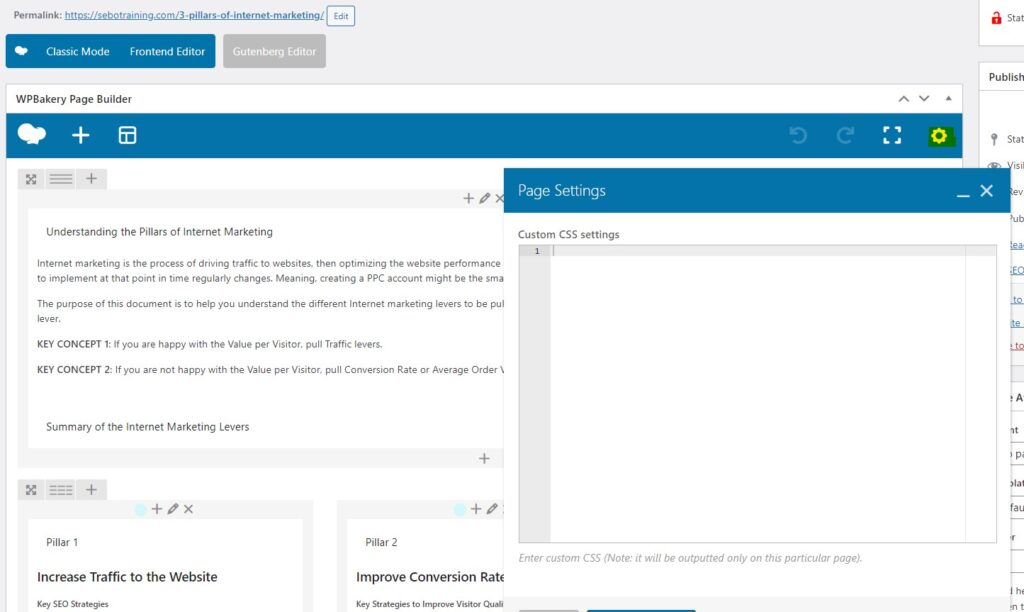
- If the page has any custom CSS, copy it over to the new page – see image to the right
- Publish the page
If neither of the above work, and you are unable to figure out a suitable solution within 5 – 10 minutes, please ask for additional assistance from the trainer over WordPress or Landing Pages.
Sebo Landing Pages are what we call our independent landing page solution. In situations where a client has an unusable CMS, they don’t want to give us access, or we otherwise need to be able to manage PPC landing pages separately, we can set up a subdomain on their domain. We would then build out the landing page on our server and have/maintain full control over the landing pages. Since we will be setting these up as subdomains, MCs will need to choose the subdomain name they want to use (i.e. try.sebomarketing.com). Sebo Landing Pages are built on WordPress using WPBakery (although we can use Elementor if you would prefer).
NOTE: For the training, watch the videos and make sure you understand the concepts in them, but don’t actually follow along — this will be the exam.
Setting Up a New Site
- Navigate to https://landingpages.verticals.sebomarketing.com/ for the new client and login to the backend
- Click “My Sites” in the top-left corner
- Select “Network Admin” > Sites
- Hover over the landingpages.verticals.sebomarketing.com and select “Clone”
- Go through all of the guided steps (give the New Site a title and URL (don’t worry, the URL will be temporary until we get things on the server side figured out))
- Click “Clone”
Creating a Landing Page
- Since you cloned the site, there will already be an example page in the “Pages” section (left-hand menu). Feel free to use this page — keep the sections you want and edit the content
- The NS Cloner Plugin has been having issues with copying everything on the site over correctly (theme settings, page settings, etc.). If the new site you cloned doesn’t already have “The 7” in place, click here for some workaround steps).
- Make sure all placeholder content is replaced with relevant content. Make sure all phone numbers, emails, and anything else like that is replaced
- Configure the form to go to the correct confirmation page
- Configure form notifications to go to the correct email address
NS Cloner Not Copying All Settings (Workaround)
Only follow the steps in the setting if the NS Cloner (from step 1) did not copy all site settings over correctly
- On the new site that you created (the one that you cloned from “landingpages.verticals.sebomarketing.com”), Activate “the7” them by clicking on Appearance > Themes > Activate the7
- In another tab, open the backend of landingpages.verticals.sebomarketing.com. Click on Theme Options (top bar) > “Export/Import Options. Copy all of the code in the “Export/Import Options field
- Go back to your new site. Click on Theme Options > Export/Import Options. Paste all of the code you just copied over the existing code. Click “Save Options”
- Click Theme Options > Page Titles
- Click “Title” > “Disabled”
- Click “Breadcrumbs” > “Disabled”
- Click “Save Options”
- Now, we need to copy the page over. In your landingpages.verticals.sebomarketing.com tab, navigate to the “Pages” section. There should only be one page in there. Click “Edit”
- From the “Classic Mode” editor, make sure the “Text” tab (top right) is selected
- Copy all of the code in the main field.
- Head back to your new site and navigate to the “Pages” section.
- Click “Edit” on the existing page
- From the “Classic Mode” editor, make sure the “Text” tab (top right) is selected.
- Paste the code into the main field (over the existing code
- Set the “Page Attributes” dropdown (right menu) to “Microsite”
- In “Microsite” (right menu) select “top bar, header & top bar”, “floating menu”, and “bottom bar”
- In “Sidebar Options” (right menu) select “Disabled”
- Click “Update”
- Lastly, we need to configure Gravity Forms. We will need to reenter the license key
- Head to gravityforms.com
- Login with the “sebo.marketing” user
- Copy the license key from the main page
- Paste it into the correct field in the backend of your new site
NOTE: Sebo used to use Unbounce for many of its clients. We have since shifted away from it, but some clients have their own Unbounce accounts that we use. For this reason, the training was left in here, but be aware that you will only be using Unbounce here and there.
Unbounce is an easy-to-use landing page builder. It is a drag and drop format that doesn’t require any coding skills to make a beautiful landing page.
In this video, you will learn how to use the various tools in unbounce to create a new page, edit an existing page, or duplicate and edit an existing page.
Quick Tips:
- Be sure to give the page a title tag, this can improve the quality score by matching the landing page to a keyword
- ALWAYS check the mobile view and make sure it looks good on BOTH mobile and desktop
- NEVER leave any assets outside the outlined guideline space (the asset will highlight red if it’s out of bounds) – this will cause desktop and mobile usability issues resulting in poor quality scores
- Follow the client’s branding with fonts, colors, style, etc. We want to match their brand while also making the page look really nice
Here’s a good checklist to go through when creating a new page
- Choosing a layout
- Follow this layout/or at least the general principles of it: https://thelandingpagecourse.com/landing-page-elements-blueprint/
- Pick a template that will allow you to easily achieve that layout while also following some of the basic design features of the current site. This will help to minimize the time it takes to change the design
- Branding
- Match the colors to what is on the client’s site
- Take the logo from the site
- Match font as best as possible
- Match other design features (rounded or square corners, background colors, text color, etc.)
- Content
- Take what already exists on the site or what the MC has asked you to put on the page (change up the wording a bit if necessary – for example, if the Call to Action takes them to another page on the site, try to vary the information so the two pages don’t say the exact same things)
- Pick out the most compelling Calls to Action, or come up with new ones and make sure they are above the fold
- Use images from the client’s site or from Unbounce and Unsplash
- Mobile
- Finish main layout before moving to mobile
- Pay attention to what’s been hidden vs. what has been shoved to the right
- Copy what needs to be moved to a new section and hide in the respective views
- Adjust until it looks good
- Page properties
- Title – title tag – match to PPC keyword
The following must be done but will be taught in another training. When completing Unbounce Landing Page tasks, be sure to make the Fulfillment Director aware that these steps will not be completed by you.
- CTA Conversion Tracking
- Make sure the desired action is trackable and appropriate to the Call to Action and promoted product or service
- Form Fill – Lead, goes to a thank you page on the client’s website
- Phone Call – Lead, call rail or Google forwarding number
- Button – ecommerce product, sends to product page
- Add page domain
- Easiest with WP sites.
- Activate plugin
- Go into plugin settings and allow Unbounce to create new pages
- Edit URL
- Select the proper domain
- Relative URL – make sure to **choose something that doesn’t already exist but matches the keyword**
- Integrations
- Domain – Make sure GTM & Analytics are connected
- Page – make sure lead forms are being sent to the right email address
- Publish
- Check desktop & mobile versions & test out call to action
- Organize the page under the MC’s folder
You will be creating a landing page for this exam. Please submit it below.


